Showing posts with label diy and crafts. Show all posts

Saturday, October 24, 2015

Fall Wreath Tutorial


This wreath was inspired by some of the non-traditional fall color decorating I've been seeing floating around on Pinterest. I wanted to make a fall wreath that wasn't bright orange or red or yellow.
Here's what I came up:


Things you need:

-Fall artifcial flower or foliage
-18" grapevine wreath
-Wire cutter
-Green craft wire
-Glue gun
-2 1/2" wired burlap ribbon
-Wooden initial


I found the arrangement on sale at Michael's. It was way cheaper than buying all these pieces individually.  The pine cone accents are from Hobby Lobby.


Take your pinecone branches, or whatever foliage you chose to use and trim off the long extra stems, just below where the branches or leaves meet.


Arrange your branches or leaves how you want them- have them covering at least one whole side of your wreath, leaving space on the other side for your initial.


Secure branches to the wreath with crafting wire where the two ends meet.


Use your glue gun to attach any any stray leaves or pinecones to your wreath.


Make a bow with your burlap ribbon. Start by forming a loop, leaving extra ribbon at the end.


Form a second loop on the other side, again, leaving extra ribbon at the end.


Wrap the crafting wire around the spot where your loops meet- to secure them together.


Adjust the burlap wired ribbon until it looks like a bow. 


To cover the wire and for the center "knotted" part of the bow, cut a strip of burlap ribbon. (As you can see I ended up covering this spot of my bow, so you can skip this part if you decide to do that as well).


Fold the sides of the ribbon to create a seam, and secure it with hot glue. 


Loop your ribbon strip around the center of the bow and secure the back with hot glue.


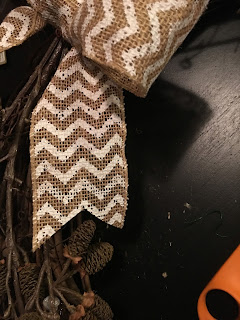
Glue your bow to your wreath where the branches meet. Trim the ribbons of the bow to your desired length, cutting a triangle shape at the end. 


Arrange your flowers/plants. I wasn't planning on covering up my bow but ended up liking how it looked!


Glue your initial on the opposite side of your wreath....and you're done! Hang on your front door and enjoy this wonderful season!

Monday, July 7, 2014

DIY Wedding Card Keepsake


I am a very sentimental person. It's hard for me to throw anything away that has the remotest sentimental meaning to me (seriously... like receipts from fun excursions... its bad, people). Of course our wedding cards were no exception. I finally decided to do something with them, and wanted to share this super simple project. You can make this with any cards, I think it would be fun with a baby's first birthday cards, or a collection of your favorite holiday cards.

Things you'll need: a hole punch, any cards you want in the book, and metal rings


I found these kits at Michael's on clearance for $1.99. They included two metal rings and canvas book covers. I just used the rings and decided to save the covers for something else.


I had two freezer bags full of wedding cards, so I decided to make two books.


I decided how far apart I wanted the holes, and started with one card. I then used that card as a template for the others to make sure they would all line up when inserting the metal rings. 


Once you have all your holes punched, decide what card you like the best as the cover and insert the metals rings. And you're done!


Such an easy and special keepsake to make!

Feel free to leave any questions in the comment section.


Monday, June 30, 2014

Patriotic Flag Banner DIY


Things you need:
  • Scissors
  • Printed burlap (in honor of Independence Day I used these two printed burlaps from Joann Fabrics: Circles & Stars, Chevron Patriotic)
  • Glue gun
  • Jute twine
  • Template for flags- you can download mine here
  • Paper clips (optional)

Directions:
  • Iron your burlap
  • Download and print template (you can adjust your printer settings according to the size of flags you prefer)
  • Use template to cut out desired number of flags. You can pin printed template to the burlap if that helps- I just printed the template on thick card stock, laid it on the burlap, and cut around it.
  • Once you have all of your flags cut out, cut your jute twine to the desired length. 
  • Attach the flags. Here's how I did that: I stretched the twine out flat on the ground. I decided how far apart I wanted the flags by setting them on top of the twine. Once I had them where I wanted them I folded over the part indicated on the template and used paper clips to temporarily attach them to the twine. This made sure they wouldn't move when I began gluing. 
  • Glue the flags to the twine by placing a thin line along the fold line indicated on the template. This is where the twine is attached to the back of the flag to ensure the flags don't slide around. Then place another strip of glue to attach the folded flap to the back of the flag. 
  • Hang indoors or outside!  
This is a great decoration for any holiday or party... I can't wait to make more!

Monday, December 9, 2013

DIY (No-sew) Burlap Christmas Tree Skirt

So once I convinced my husband that we should go get a real Christmas tree, even though we will only be at our house the first two weeks before Christmas, before we fly home (!) ...I decided I would make a Christmas tree skirt. The one problem is...I don't have a sewing machine...and even if I did...I don't really know how to sew. I wasn't about to start sewing things by hand. I searched high and low for a tree skirt tutorial that didn't require sewing, and none were to my liking. So I created one myself, I love how it turned out!


What you need:
1-2 yards of any color burlap (depending on how big you want your skirt) I used what I had on hand, which was about 2 yards.
A glue gun (my best friend)
A large roll of satin ribbon
Scissors

Fold your burlap in half, and then in half again to create a square. Cut the folded fabric into a quarter of a circle- to form a full circle when unfolded. You can use a ruler to measure how large you want your circle to be- I had a tree skirt on hand that I used as a template. Once your large circle is complete, cut another quarter of a circle to create the opening for your tree's trunk. 


Iron your unfolded circle.


Cut a 3-4 inch wide strip of burlap...I used a different color, but it can be whatever you like! Cut this strip into smaller strips, about 5-6 inches long.


Starting at one end of the small strip of burlap, begin removing the strings running lengthwise, to create a fringe. Leave about 3/4 of an inch at the top. You will need a lot of these! I created a bunch until I got bored, and then started attaching them to the skirt, and making more as I went.


Add a strip of glue with the glue gun, and attaching your fringed strips of burlap around the entire circle. Overlap about 1/2 inch at the ends so there aren't any gaps. 


Now for the satin ribbon border. This is probably the trickiest part, but once you get the technique down its super simple! The goal of this border is to add a beautiful detail, and cover the top of the burlap strips. Start by picking a spot of the circle where you are planning to cut your opening to go around the tree...(this is mainly important if your circle is not completely symmetrical...like mine).


Create a 1-2 inch strip of glue along on the top of the fringed border...you don't want to the glue to dry before you've created the ruffled detail...so start with a smaller strip of glue until you're comfortable with the technique. 


Create a ruffle. This is easiest to do by folding the ribbon to create a "bubble" in the ribbon.


Using a finger, press down on the "bubbles" you created in the ribbon. This will give you the ruffled look. This takes some time to get the hang of, so take your time- once you get it down, it goes much faster!


Once your satin ruffle is complete, cut the opening for your tree where the ends of your ribbon meet. I also added a little detail with some burlap roses and maroon satin ribbon, to tie the tree skirt in place.


Leave any questions in the comment sections below!


Saturday, November 9, 2013

Office Space - A DIY

I LOVE the town home my husband and I are currently renting. It has a great master bedroom, and beautiful and spacious kitchen, and more than enough room for the two of us. We have one spare bedroom that we have decided will be our guest room...AND our office. At first this idea seemed wrong to me: offices are desks and computers and file cabinets, not exactly a warm and cozy place to keep loved ones. So...my mission has been to create a space that is both homey AND practical.

Once I had colors picked out in my head, I started to brainstorm ways to save space. Also, I desperately needed a filing cabinet. I decided to re-vamp a dusty old file cabinet I picked up at goodwill for about $5. I thought it could serve a double purpose as a night stand.


I started by taking off the handles, and removing the drawers. I spray painted the body and drawers of the cabinet gold, and the handles and drawer tags white. I am happy with the result! The only change I would have made would be to prime the cabinet- it still looks good but primer makes for a more even finish.


Bed frame: Ikea  Comforter: Marshalls  Sheets: Target  Rug: Ross


Has anyone done something similar? Any good tips or ideas?